
Hailo 8 Raspberry Pi Setup Guide for Real-Time AI Inference
- Adrian Araya
- Jul 29, 2025
- 5 min read

The Hailo 8 Raspberry Pi combo brings real-time AI inference to edge devices. In this guide, you'll learn how to install and configure Hailo 8 with Raspberry Pi 5 using official kits, run deep learning models, and explore real-time inference pipelines.
What is the Hailo-8 AI Accelerator?
The Hailo-8 AI accelerator is a high-efficiency, low-power processor designed for real-time AI inference on edge devices like the Raspberry Pi 5. With up to 26 TOPS of performance, it’s ideal for deep learning applications such as object detection, image classification, and computer vision. You can find detailed specs and benchmarks on the official Hailo-8 product page.
What You Need to Set Up Hailo 8 on Raspberry Pi 5
To follow this guide, make sure you have the following components ready:
A Raspberry Pi 5 (any memory configuration might work)
One of these compatible AI accelerators:
The Raspberry Pi AI Kit, which comes with:
Or the Raspberry Pi AI HAT+ (includes Hailo-8 or Hailo-8L module built-in)
A 64-bit version of Raspberry Pi OS installed on your device
It is recommended to have the latest version of the Raspberry operating system; you can follow the official Raspberry Pi Os installation guide to install it.
Hardware Setup: Connecting Hailo 8 AI Kit or AI HAT+ to Raspberry Pi 5
As mentioned in the prerequisites, there are two compatible hardware options to run the Hailo-8 AI accelerator on a Raspberry Pi 5: the Raspberry Pi AI Kit (which includes the M.2 HAT+ and a Hailo-8 or Hailo-8L module) and the Raspberry Pi AI HAT+. The installation process is identical for both, but the physical connection method differs slightly. Let’s walk through how to connect each one.
Note: Always connect or disconnect the HAT with the Pi powered off.
Hailo 8 Raspberry Pi Setup with AI HAT+ Board (built-in module)
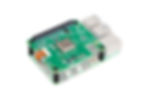
This option uses a dedicated HAT board that connects to the Pi via the GPIO header and a ribbon cable. Here's how to assemble it (based on the official Raspberry Pi AI Kit documentation):
Attach the ribbon cable from the AI HAT+ to the M.2 interface on the Raspberry Pi 5. Make sure the cable is securely seated in both connectors.
(Optional) Align the GPIO header on the AI HAT+ with the 40-pin GPIO header on the Raspberry Pi 5 and press down gently until fully connected (only required if you are going to use the GPIO pins).
(Optional) Secure the HAT with spacers and screws for a more stable build (especially important if you plan to move the setup around).

Hailo 8 Raspberry Pi Setup Using AI Kit (M.2 HAT+)
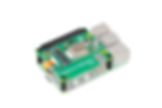
If you're using the Raspberry Pi AI Kit, note that the Hailo-8 or Hailo-8L module is not embedded in the M.2 HAT+. Instead, these modules must be manually inserted into the HAT+ as part of the setup process. Once installed, the M.2 HAT+ connects to the Raspberry Pi via the PCIe interface. Follow these steps (based on the official AI HAT+ guide):
Remove the PCIe slot cover on your Raspberry Pi 5 (if installed).
Insert the M.2 HAT+ board into the PCIe slot using the provided ribbon cable and make sure it locks into place.
(Optional) Connect the 40-pin GPIO header from the HAT+ to the Raspberry Pi, just like a regular HAT (only required if you are going to use the GPIO pins).
(Optional) Secure the board with the included standoffs and screws for better mechanical stability.

Both setups prepare your Raspberry Pi 5 for installing the Hailo Software and running AI inference examples, we'll dive into that next.
Installing the Hailo SDK and Drivers on Raspberry Pi 5
Once you’ve connected the Hailo-8 hardware, powered on your Raspberry Pi, and confirmed that you're running the latest version of Raspberry Pi OS, you’re ready to install the required software stack. All the following steps should be performed directly on the Raspberry Pi, either by connecting a monitor, keyboard, and mouse, or by accessing it remotely via SSH.
Start by updating your system to ensure all packages are up to date:
Next, check your Raspberry Pi firmware version:
If the firmware date is earlier than 6 December 2023, update it by launching the configuration tool:
Navigate to: Advanced Options → Bootloader Version → Latest, then select Finish and run:
Once your system reboots, install the complete Hailo SDK and required components with:
This command installs everything needed to run inference on the Hailo-8, including the firmware, runtime libraries, TAPPAS tools, OpenCV, GStreamer plugins, and deep learning post-processing utilities. The installation process may take several minutes depending on your internet connection and SD card speed.
After installation, confirm that the Hailo-8 module was successfully detected:
You should see information about the connected Hailo device, firmware version, and architecture.
To further verify that the driver was properly initialized, run (you should see hailo device logs):
And finally, check that the GStreamer plugins are registered and ready to use:
You should see something like this:
If everything is installed correctly, you’re now ready to run your first AI inference example using the Hailo-8 accelerator on your Raspberry Pi.
Run Real-Time AI Models on Raspberry Pi with Hailo 8
With everything installed, it’s time to test your setup by running an actual inference example using Hailo’s Raspberry Pi 5 demo repository. These examples showcase real-time detection pipelines that leverage the Hailo-8 accelerator.
First, clone the official repository and run the installer:
Next, source the environment variables required for the examples:
If you're using ssh with a graphical session (with a connected monitor), export the display environment variable (ignore this if you are using the terminal directly from the Raspberry Pi):
Finally, run a simple object detection demo:
This pipeline will launch a real-time detection model using your Hailo-8, demonstrating the full flow from input to on-screen results. You’re now successfully running AI on the edge!
In addition to this demo, the hailo-rpi5-examples repository contains several other inference examples, including object tracking, classification, and advanced GStreamer pipelines, all well-documented and ready to try. Explore them to further expand your edge AI capabilities with Hailo-8 and Raspberry Pi.
Convert Your AI Models to Hailo 8 Format for Raspberry Pi Deployment
If you're ready to go beyond the built-in demos and run your own neural networks on the Hailo-8, you'll need to convert your model (for example, from .onnx) to Hailo’s optimized .hef format.
We’ve documented the entire process, from model parsing and quantization to optimization and compilation using the Hailo Model Zoo and tools, in a dedicated blog post. Check it out here.
🚀 Taking Edge AI Further? We Can Help
If you're working on edge AI applications and want to go beyond basic examples, whether that means deploying custom models, integrating real-time processing pipelines, or optimizing performance on Hailo-8 and Raspberry Pi, we’d love to collaborate.
At RidgeRun.ai, we specialize in AI consulting services, helping teams bring high-efficiency inference to production with custom integrations, hardware tuning, and robust GStreamer pipelines tailored for your use case.
Reach out to us at support@ridgerun.ai — let’s take your edge AI project to the next level.