
First Steps with Hailo-8 on x86
- Melissa Montero

- Jul 17, 2025
- 6 min read
The Hailo-8 AI accelerator brings powerful and efficient deep learning inference to your devices. Whether you're building smart cameras, real-time analytics systems, or compact AI applications, Hailo-8 enables seamless integration of neural network inference in your environments. Now you can unlock that performance directly on your x86 machine.
For a deeper understanding of the Hailo-8 accelerator, you can explore the Hailo official product page, and check out RidgeRun’s Hailo Wiki.
Once you have your Hailo-8 in hand, this blog will guide you step-by-step through setting it up and running AI inference on your x86 system.
How to Connect a Hailo-8 to your PC?
The Hailo 8 is connected to a host through a PCIe interface. You have the following options to connect it to your PC depending on your available ports:
M.2 connectors: Hailo offers Hailo-8 M.2 modules with various key configurations: A+E(2 PCIe lanes), B+M(2 PCIe lanes) and M(4 PCIe lanes). If your motherboard has a compatible M.2 slot, you can install the module directly. This is the most compact and integrated option.

Hailo-8 M.2 modules: M key, B+M key and A+E key. Source: Hailo AI (hailo.ai) PCIe adapters: As an alternative if your PC has a standard PCIe or mini PCIe (mPCIe) slot, you can use a PCIe to M.2 adapter to connect the Hailo-8 module.

Hailo-8 M.2 AI-accelerator module mounted on a PCIe adapter card. Source: Hailo AI Community (community.hailo.ai) Thunderbolt NVMe adapter: If your PC includes a USB-C with Thunderbolt support, you can use the Thunderbolt NVMe enclosure to connect your Hailo-8. Note that standard USB or non-Thunderbolt NVMe adapters are not compatible, make sure the enclosure explicitly supports Thunderbolt.

Hailo-8 M.2 AI-accelerator module mounted on a NVMe Thunderbolt adapter.
Once connected to your PC you can verify the Hailo-8 is detected on the PCIe bus, just run the following command in your console:
You should get an output like the one below showing a Co-processor device:
Accessing the Hailo Developer Zone
To download the Hailo Software Suite and access products specific documentation, you need to create an account in the Hailo Developer Zone.
If you already have an account, sign in using your email and password. Otherwise, click “Sign up” on the login page to register.
Once logged in, you’ll gain access to the latest software releases, developer guides, example applications, and more.

Get the Hailo-8 Software Stack for x86
Hailo provides a software stack, with solutions from the driver and tools to example applications to support your Hailo-8 development. The software package is called Hailo Software Suite and it includes a set of frameworks and utilities organized in four main components:
HailoRT: The runtime environment and driver for executing neural networks and interfacing with Hailo devices.
Dataflow Compiler: Converts trained models into Hailo’s optimized binary format.
Model Zoo: A collection of pre-trained models for benchmarking and evaluation.
TAPPAS: A deployment framework that includes example applications and multi-network pipelines.

Each component can be installed separately, but to avoid version mismatches, Hailo releases a quarterly software suite with aligned versions for all components. To ensure compatibility, it's recommended to install the suite as a whole, rather than mixing component versions manually. Check the version's compatibility here.
The software stack can be installed in three different ways:
Self-extractable installation.
Docker installation.
Manual installation (not covered here).
In this guide, we’ll cover the first two methods. Choose the one that best matches your development environment.
Get Self-Extractable Installer
Select the options that best match your target system. (The example below shows our selection for a PC running Ubuntu 20.04.)
Filter the packages using the keyword self to locate self-extractable packages.
You’ll see a list of packages sorted by release date.
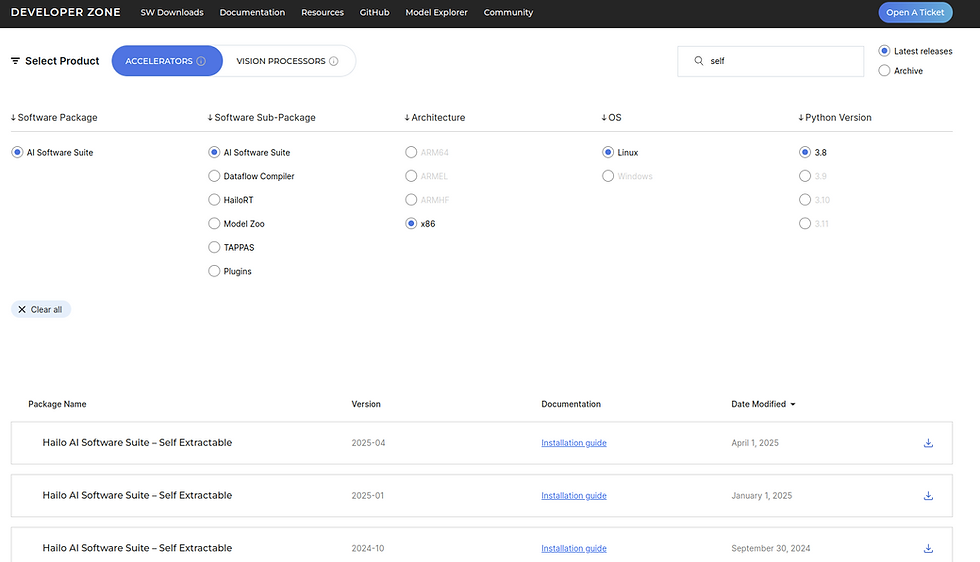
The latest version at the time of writing is 2025-04, but this version does not include TAPPAS or the Integration Tool. Since we’ll need TAPPAS for final testing, we’ll use version 2025-01, which includes all required components.
Get Docker Installer
The Docker-based setup requires two packages:
The Docker-based Software Suite
The Hailo Driver, which must be installed separately
To download the docker suite follow the next steps:
Select the options that best match your target system. (The example below shows our selection for a PC running Ubuntu 20.04.)
Filter the packages using the keyword docker to locate the Docker suite packages.
You’ll see a list of packages sorted by release date.

As with the self-extractable installer, the latest version (2025-04) lacks TAPPAS and Integration Tool support—so we’ll use 2025-01 again here.
To download the driver:
Search for packages using the keyword driver to locate the PCIe driver package.
Select the version that matches your suite. In this case, driver version 4.20.0, which is compatible with suite 2025-01.

Hailo Developer Zone download page filtered for the AI Software Suite on x86 Linux with Python 3.8, showing the latest PCIe driver package versions.
Step-by-Step: Self-Extractable Installation.
To install the Hailo Software Suite you need to install the dependencies and follow the next steps:
Make the file executable with the following command:
Run the installer:
Without TAPPAS:
With TAPPAS (It takes longer to install):
Notice the space between -- and install-tappas
After the installation is complete, activate the virtual environment with the following command
Step-by-Step: Docker-Based Installation.
To setup a docker container with Hailo Software Suite you need to follow the next steps:
PCIe Driver Installation
Install the PCIe driver that you already downloaded with the following command
In our case we install the driver version 4.20.0:
Reboot your PC to load the driver properly.
You can verify the driver installation by checking dmesg log.
Create Hailo Docker Container
Extract the docker installer script with the following command:
In our case we use the software suite 2025-01 as follows:
Run the script that creates a new container named hailo_ai_sw_suite_<version>_container (e.g hailo_ai_sw_suite_2025-01_container)
As you can see when the script finishes you are inside the container in a hailo virtual environment and you are ready to test!. You can exit the container by using the exit command.
The script created a shared directory between the PC and the docker container. You can find it in the same folder where the script was run, it is named ./shared_with_docker and inside the docker container is located at /local/shared_with_docker.
Resume Docker Container
Once you exited the container you can get back in using docker regular commands like the followings:
Or you can use the installer like shown below:
Overwrite Docker Container
You can overwrite your existing hailo container using the override option as follows:
Run your First Inference on your PC
At this point you need the Hailo-8 connected to your PC and you need a Hailo environment, docker or virtual environment enabled according to your install preference.
First you can identify your device using the hailortcli command line as follows:
Now you are ready to run your fist inference, the easiest path is to run one of the examples included in TAPPAS. For the self-extractable setup you can find it where you run the installation at hailo_ai_sw_suite/artifacts/tappas and inside docker container at /local/workspace/tappas.
The applications can be found at apps/h8/gstreamer, there are directories for specific platforms but here we are going to stick to the general examples:

The sample applications are based on GStreamer, so each application prints the pipeline that is being used. You can also print the framerate with the option --show-fps.
Below is the output of running the detection example in our docker environment:
And this one is for the plate detection example:
You can run any of the examples using similar commands just move to the directory of the example you are interested in, look for the script and run it. Each example includes a README with detailed instructions of how to run it, options and what is using each of the examples, even includes gifts showing the output of each of them. You can always check them in the tappas github for better visualization of the READMEs.
Got your first model running? Let us know in the comments or reach out at ridgerun.ai if you’d like support integrating Hailo-8 into your product.


Comments