
First Steps with the MediaTek Genio 700

The MediaTek Genio 700 is a high-performance edge AI System-on-Chip (SoC) designed for embedded applications with a focus on power efficiency. This platform provides the performance and flexibility needed to run modern deep learning workloads directly on-device.

The MediaTek Genio 700 integrates a heterogeneous computing architecture composed of:
Octa-core CPU: 2× Arm Cortex-A78 performance cores and 6× Cortex-A55 efficiency cores.
GPU: A high-performance Arm Mali G57 MC3.
Neural Processing Unit (NPU): A 5th-generation AI engine composed of 1× MediaTek Deep Learning Accelerator (MDLA) 3.0 and 1× Tensilica VP6 processor.
The MediaTek Genio 700 also provides advanced multimedia and system support, including:
4K video encode and decode capabilities
Dual-display output
Camera input up to 32MP@30fps through the ISP
Support for operating systems such as Yocto Linux, Android, and Ubuntu
These features make it suitable for applications such as smart retail, smart home systems, and industrial vision.
In this guide, we will walk through the initial setup process using a Yocto-based system, including preparing the development environment and flashing a system image on the device.
MediaTek Genio 700 Hardware Overview
The MediaTek Genio 700 development kit, also known as SBC-MB710, is a single-board computer built by Amobile Solutions around the MediaTek Genio 700 SoC. It provides power delivery, connectivity and a wide range of external interfaces required for development and debugging.
For this guide, we will use the SBC-MB710 development kit. If you are using a different carrier board with the MediaTek Genio 700 SoC, some steps may vary depending on the hardware configuration.
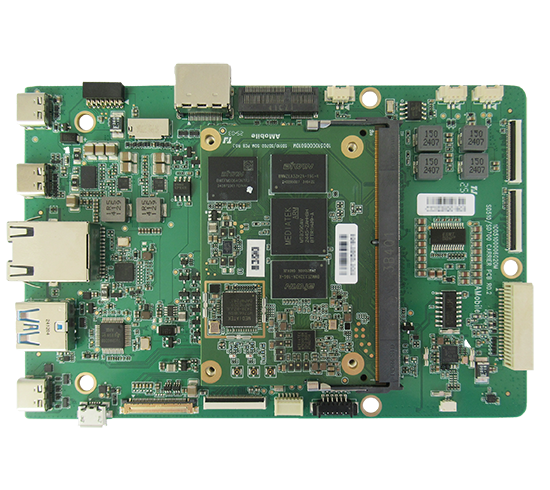
The MediaTek Genio 700 board exposes several interfaces, but the most relevant ones for this guide are:
USB-C port (power input): Used to power and flash the MediaTek Genio 700 board.
Micro USB (UART): Provides access to the serial console for debugging.
Expansion connector: Used for low-level hardware interaction. It is composed of 40 pins that enable low-level hardware control and configuration tasks. (e.g. start the board in DOWNLOAD mode)
Setting Up the MediaTek Genio 700 Development Environment
Follow the instructions below to install the packages required.
Yocto Setup
Yocto is used to build custom Linux images for embedded systems. In the context of the MediaTek Genio 700, it allows you to generate a bootable system image tailored for the platform.
Yocto Build Requirements
Ubuntu 22.04 (LTS)
At least 200 GiB of free disk space
At least 16 GiB of system memory
Install Required Yocto Packages
These packages are required by the Yocto build system to fetch sources, compile components, and generate the final image.
Install Repo Tool for Yocto Environment
The repo tool is used to manage multiple Git repositories required by the Yocto build environment.
Get Yocto Source Code
Before building a Yocto image, you must obtain the Yocto source package corresponding to your platform.
As you can see in Amobile Build from Source Code, you need to contact Amobile Solutions to get access to the sources for your SBC-MB710 board or any Amobile board which provides specific sources for their boards.
For other MediaTek-based platforms please contact MediaTek according to Mediatek Build From Source Code to obtain access to the sources you need.
Create a Yocto Image From Source Code
To create an image for flashing your MediaTek Genio 700, you need to initialize the Yocto Build Environment.
(Optional) To improve download reliability, you can add the following lines to sd700_build/conf/local.conf:
Then run the following command to start the Yocto build process:
Once the build process completes successfully, the generated image will be ready to be flashed on the MediaTek Genio 700 device. The image will be generated in:
Genio Tools Setup
Genio Tools is a set of utilities provided by MediaTek to interact with their platforms. These tools are used for tasks such as flashing the device, configuring the development environment and communicating with the board over USB and serial interfaces.
Genio Tools Requirements
To install Genio Tools on a Linux host, ensure you have the following:
Ubuntu 18.04 LTS or later
Administrator privileges
Internet connection
Git 1.8 or later
Python 3.8 or later
pip 20.3 or later
Fastboot 28.0.2 or later
Install Required Packages for Genio Tools
These packages provide the required tools for communicating with the MediaTek Genio 700 device over ADB and Fastboot.
Configure USB Device Rules for MediaTek Genio 700
udev rules allow the system to recognize the MediaTek device and grant the appropriate permissions without requiring root access.
To create a udev rule for USB access without root privileges use:
For adb access, add a rule and include your user in the plugdev group:
UART Setup on MediaTek Genio 700
UART access is required to communicate with the board over a serial connection. To enable this, your user must have permission to access serial devices. To give this permission to your user, add it to the group dialout:
Ensure your user is in the dialout group to connect to the device:
If "dialout" doesn't appear in the output, log out and log back in to apply changes or you can restart the host system to ensure the change takes place.
Install a Serial Terminal Emulator
A serial terminal emulator is required. For example, you can use Minicom, which can be installed with:
We use Minicom but feel free to use any terminal emulator you prefer.
Install Genio Tools
Install Genio Tools using the following command:
To verify that genio-tools is correctly configured use:
Ensure that all checks report OK, as this is required before flashing an image on the MediaTek Genio 700.
If genio-config reports errors:
Ensure the USB device is connected
Verify udev rules were reloaded correctly
Log out and log back in to apply group changes
Connecting to MediaTek Genio 700 via UART
To establish a UART connection for debugging on the MediaTek Genio 700, connect the micro-USB port of the board to the host system.
The UART interface operates at different stages of the boot process, each providing a different level of system visibility and using a specific baud rate:
Console | Baud Rate | Purpose |
|---|---|---|
Download Agent | 921600 | Download progress log from download agent (lk.bin) when using genio-flash |
Boot ROM | 115200 | SoC boot ROM logs and messages |
Bootloader Console | 921600 | U-Boot console for debugging and boot configurations |
Linux Console | 921600 | Kernel messages and Linux console |
You can read the serial output by select the appropriate serial device:
Then to monitor the Linux console and kernel messages, run:
To capture early boot messages from the Boot ROM, run the following command before powering on the device:
Note: The device name may vary (e.g., /dev/ttyUSB0 or /dev/ttyACM0). You can verify it by running:
Flashing the MediaTek Genio 700
To flash an image to the MediaTek Genio 700, the board must be placed into DOWNLOAD mode. This requires coordinating both software execution and a hardware trigger.
Before starting:
Ensure the board is powered off
Ensure genio-tools is correctly installed
Have a USB-C to USB-C cable ready
MediaTek Genio 700 Flashing Procedure
Follow the steps below to flash the image:
On host system, navigate to the image directory and start the flashing process:
Important Considerations:
Device Tree Blob Overlays (DTBO) are used to configure hardware-specific features at boot time, such as RAM size, GPU, display interfaces, and connected peripherals. Each overlay enables or customizes a specific hardware component for the target board.
Output of genio-flash command:
The tool will wait until the MediaTek Genio 700 is detected in DOWNLOAD mode. These warnings indicate that the tool could not automatically reset the board into DOWNLOAD mode, because the board has not yet been detected.
At this point, connect a USB-C to USB-C cable to the power port of the board, but don’t connect the other end yet. It is necessary to use a USB-C to USB-C cable to connect, it won’t work with a USB-C to USB-A or any other variation.
You should short the DOWNLOAD pin of the expansion connector of the board with GND, so we recommend to use an alligator clamp connected to USB-C shell of the power input port with the pin #37 of the expansion connector.
Keep in mind that the pin is small, so you may need to also use a jumper to touch the correct pin. Keep shorting the DOWNLOAD pin with GND.
Then connect the other side of the USB-C to the host system while keeping the DOWNLOAD pin shorted. If the host system doesn’t have a USB-C port, you can use a USB-C OTG adapter.

DOWNLOAD Pin of expansion connector If everything is okay, you will see the terminal start to flash the image on the MediaTek Genio 700. Wait for the flashing process to complete. Example of a successful flashing process:
When the process completes, your image will be successfully flashed and the device will automatically boot the newly flashed system.
Once the boot process is completed, log into the system using the default root user:
At this point, the MediaTek Genio 700 is successfully flashed and ready for development. Getting started with the MediaTek Genio 700 is the first step toward building powerful edge AI systems. With your first image successfully flashed, you now have a platform ready for experimentation, customization, and deployment. We hope this guide has given you the confidence and guidance needed to start exploring the capabilities of the Genio 700 and bringing your embedded AI ideas to reality.
Ready for the next step? Check out our guide on How to Convert Models to DLA for MediaTek Genio 700 and our blog post How to Convert Models to DLA for MediaTek Genio 700 to learn how to take advantage of the platform's dedicated AI acceleration capabilities and maximize inference performance.
Need Help Bringing AI Applications to MediaTek Genio 700?
MediaTek Genio 700 enables developers to build powerful edge AI applications, but bringing those applications to production requires more than getting the platform up and running. RidgeRun.ai specializes in optimizing embedded Linux systems, accelerating AI deployments, integration workflows, and building scalable edge AI solutions.
We can assist with AI model deployment and optimization, efficient GStreamer integration, hardware bring-up, and performance measurements to help you maximize the capabilities of your MediaTek-based products.
Contact RidgeRun's AI Engineering Services to learn how we can help you unlock the full potential of the MediaTek Genio 700 platform. Contact us at contactus@ridgerun.ai — let’s collaborate!
